 Do-it-yourself…This is the second part of the project — I recovered the torn cushion — click HERE for that DIY post.
After that refurbishment, it was clear that I needed to find a way to create a matching canopy. There was no way I could be satisfied with two different patterns and color schemes.
There are tons of online tutorials, but I decided to freestyle it — I took a bunch of measurements and went back to JoAnn‘s Fabrics.
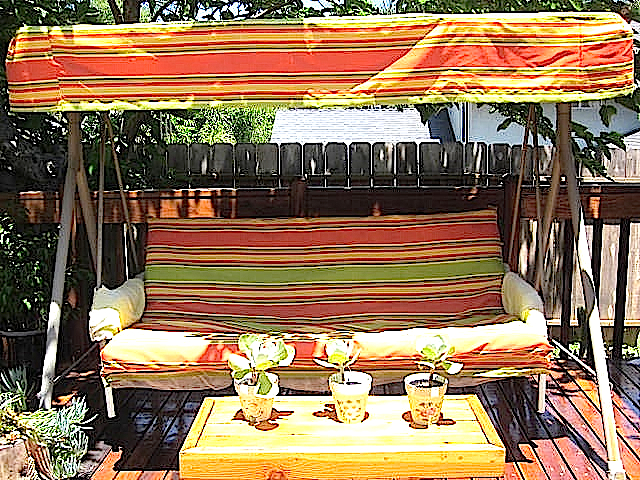
First I cut and pinned the striped material to the top; then I hemmed all the raw edges; repinned, and sewed it all together. It was sooo difficult to work with that much canvas material, especially the way it bunched up on the sewing machine, but I persevered because I’m stubborn that way.
It feels good to try new things, but I’ll definitely NOT take on this project again!
The corners were tricky…but from far away it looks fine!

Under the shade of a non-fruiting mulberry tree…with an orange orchid photobombing the picture.

It looks great if you don’t get too close…matching up the stripes is always a challenge; one side’s perfect — the other not so much. Oh well…
What do you think? Have you ever tackled a job or a project even though it’s incredibly difficult? Were you proud of yourself for meeting the challenge or did you give up before it was completed?
Related articles
- 5 Simple Sewing Projects to Replace Disposables (craftingagreenworld.com)
- Looking To get a Mini Sewing Machine (crystalbeadsxrl.wordpress.com)

It looks great! I constantly struggle with DIY projects, but I think if you love it, enjoy the process, and are happy with the outcome.. it’s a success! No matter how many curse words presented in the making 😉
LikeLike
I agree with you to a point..I know I’m gonna be obsessing over all the little problems with it css it’s not perfect. until i throw it out and buy a whole new swing or something! But for now it’s good.
LikeLike
That looks incredibly awesome!!! I agree, the solid color is a great idea. The whole thing is just so bright and cheery…and inviting! Perfect place for wine and a book.
I think my proudest project is a wool poncho I made for my husband years ago. I cut apart a rubber rain poncho for the basic pattern and made changes from there. Of course, the wool was striped, so all that had to be matched. The seams across the shoulder areas are sewed like blue jean seams, where they’re folded and tucked and reinforced five ways to Sunday; huge hood with a draw string; barrel buttons on the sides so he can close it up some; a drawstring inside front and back to cinch it in. And it is big enough to use flat as a blanket. I swore I would never made another one…
LikeLike
Wow, that poncho sounds amazing-your hubs is a lucky guy! All I need besides a book and a class of wine is my tugboat man to share it with!
On Tue, Jun 11, 2013 at 8:10 AM, Enchanted Seashells…Confessions of a Tugbo
LikeLike
I agree. A cozy spot is always better when shared. 🙂
LikeLike
Sigh…this is getting to be a bit of a burden, being alone so much. Looking forward to our 3way tonight! (haha)
On Tue, Jun 11, 2013 at 11:52 AM, Enchanted Seashells…Confessions of a Tugbo
LikeLike
HAHA…just about fell off my chair laughing at that comment. People are going to start to wonder… I’m just hoping my family behaves themselves in the background tonight. I’d hate for you and A to see the real me (cussing and screaming for people to shut it) on our first chat.
And I know how you feel when hubby is gone. Mine used to work away. That’s how I developed all my hobbies. I HAD to stay busy with stuff. Now I have more projects lined up than I know what to do with.
LikeLike
I hear ya. I save things to do while he’s away. Can’t wait to chat!
On Tue, Jun 11, 2013 at 12:00 PM, Enchanted Seashells…Confessions of a Tugbo
LikeLike
Well aren’t you the little DIY fairy. Nicely done my friend. Nicely done. Now- are you booking appointments? I need help down here on my patio.
LikeLike
I have a suggestion for you-buy it at a store, ha ha ha! I’m not 100% convinced that the labor and frustration and lack of perfection is worth whatever money I saved. LOL
On Tue, Jun 11, 2013 at 8:19 AM, Enchanted Seashells…Confessions of a Tugbo
LikeLike
Looks great. I can see why that would be frustrating with the canopy and all that fabric but you’ve created a lovely spot. 🙂
LikeLike
Thank you! We do really love bright colors around here and I couldn’t find anything similar.
On Tue, Jun 11, 2013 at 8:25 AM, Enchanted Seashells…Confessions of a Tugbo
LikeLike
I think that you did a good job! Nice and bright and colorful. I know it’s not easy working with the fabric and you did good. You should feel proud of yourself!! One project I would never do again is making wedding and bridesmaid dresses. Years ago I did several times. Satin is so slippery and having yards and yards of it was a pain to work with. Also when the last bride gained 15 lbs the last month due to nerves and had to adjust so that the dress would still fit. After that said no more 🙂
LikeLike
OMG, satin is the worst, getting all puckery and sliding around, I hear ya! I don’t think I’ll undertake this project again, but I’m glad I finally finished it.
On Tue, Jun 11, 2013 at 8:39 AM, Enchanted Seashells…Confessions of a Tugbo
LikeLike
I can understand that. Thanks for listening to my rant on satin. Didn’t mean to go on but when you said about a project you wouldn’t do again the wedding dress came to mind!
LikeLike
I do SO understand! Sometimes a labor of love can test us! Other than tacking it down with hand sewing, how in the world DO you sew satin without problems?
On Tue, Jun 11, 2013 at 2:44 PM, Enchanted Seashells…Confessions of a Tugbo
LikeLike
There are what they call ‘satin pins’. They are small and don’t leave a hole in the fabric and are also extra sharp.
LikeLike
wow, i just learned something, I never knew, not that i think i’ll ever sew satin, but stranger things have happened. Thank you!
On Tue, Jun 11, 2013 at 7:47 PM, Enchanted Seashells…Confessions of a Tugbo
LikeLike
Uh, I need to do more work on our outdoor living space. I have lights that need hanging, used patio furniture to find & purchase, plants to re-pot. This post just reminds me how much I need to do, lol.
It looks lovely, btw. 🙂
LikeLike
Thank you! I’m just so stubborn I didn’t want to settle for what there was in the marketplace. There’s always so much to do, don’t sweat it, the projects aren’t going anywhere!
On Tue, Jun 11, 2013 at 9:24 AM, Enchanted Seashells…Confessions of a Tugbo
LikeLike
I just joined #WLCBlogFollows YOU should too! http://bit.ly/WLCBlogFollow #WLCAuthor #community
Syl Stein
LikeLike
I joined too, will visit you there and thanks for stopping by!
LikeLike
I just joined #WLCBlogFollows YOU should too! http://bit.ly/WLCBlogFollow #WLCAuthor #community
LikeLike
You made it into an inviting space and you should be very pleased with it.
LikeLike
Thank you so much, I’m looking at it right now and if I don’t see the imperfections close up, I can be happy with the results!
On Tue, Jun 11, 2013 at 9:37 AM, Enchanted Seashells…Confessions of a Tugbo
LikeLike
Beautiful!
And “colour apathetic”–love it! 🙂
LikeLike
You’re the only one that got that LOL, and isn’t it true? Uh, that’s green, no it isn’t, it’s aqua, oh well, that’s a sorta green, right? See? Totes apathetic. Geez
On Tue, Jun 11, 2013 at 10:23 AM, Enchanted Seashells…Confessions of a Tugbo
LikeLike
I love DIY -but sewing…eh, that’s not a good discussion with me. !!! LOL
Your project turned out beautifully! Martha better be watching her back!
LikeLike
Hahaha Martha! She is such a perfectionist I don’t know if anybody could come up to her expectations! I am PRETTY happy with the results but I’ll be kind to myself cos it’s the first one I’ve done. What’s up with your DIY? hmmm.
On Tue, Jun 11, 2013 at 12:02 PM, Enchanted Seashells…Confessions of a Tugbo
LikeLike
Wow! That is a big project! I think it looks great, the perfect place to relax with a book or a husband.
LikeLike
Thank you, I’ll have to take the book option for now-hubs is gone again 😦
On Tue, Jun 11, 2013 at 12:25 PM, Enchanted Seashells…Confessions of a Tugbo
LikeLike
Wow, that looks great. I’m DIY klutz and am so impressed with this. 🙂
LikeLike
All is takes is the willingness to try and hubs always tells me to just try and that’s half the fear gone right there, and he’s right! I’m not pleased cos it’s not perfect but overall, I like it. And I sent him a pic of it and he likes it and can’t wait to get home and sit on it (or take a nap, which is his favorite past time!)
On Tue, Jun 11, 2013 at 2:33 PM, Enchanted Seashells…Confessions of a Tugbo
LikeLike
Hooray for DIY… ack, gross, hack, cough. No. Every time I tackle a project around the house I feel like I’m biting off more than I can chew. I’m not Mr. Fix-it. But, I’m stubborn, so once I’ve started I’ll see it through to the end.
LikeLike
That’s just like hubs; stubborn and determined! Must be a guy thang. ha ha
On Tue, Jun 11, 2013 at 3:05 PM, Enchanted Seashells…Confessions of a Tugbo
LikeLike
Job well done! My trick is to stick with the little things – like colorful summer wreaths made from flip flops. I do small crafty things and leave the bigger stuff (and painting) to my hubby.
LikeLike
I MUST see the flipflop wreath! Have you blogged about it? It sounds so adorable and I’ve got a ton of FFs I don’t wear anymore.
On Mon, Jun 17, 2013 at 4:08 PM, Enchanted Seashells…Confessions of a Tugbo
LikeLike
Oh, yes… just last week. Come see! Come see! http://beachtreasuresandtreasurebeaches.com/2013/06/06/do-it-yourself-flip-flop-wreath/
LikeLike
How did I miss that? I’m going there right now, thanks!
On Mon, Jun 17, 2013 at 5:05 PM, Enchanted Seashells…Confessions of a Tugbo
LikeLike