It’s SPRING!
What a great time to freshen up the yard with a totally 100% free project using items we already had.  Don’t throw away those cracked cups with broken handles!
We all know I’m a collector of things, whether it’s empty boxes (‘cos you never know when you might need one) or bathrobes ( I have about fifty of them) or seashells (of course!) — and all the rest: shoes, jewelry, books…
I’m also a breaker of things — like coffee mugs and wine glasses.
At any given time, I have half dozen injured/wounded/disabled cups that’re in various stages of rehab.
Most of the repaired cups and mugs aren’t really usable for holding hot liquid, but I’ve held onto them because I love them and they’re special to me…Hello Kitty, Yale Mom, and the ones with seashell motifs — I mean, how can I just toss these guys in the trash?
One fine Sunday afternoon, I felt the itch to start another DIY project but nothing specific came to mind — just thought I’d wander around until something sparked interest — then I discovered an old boat ramp behind our greenhouse (not sure what boat it came from). I’d seen this ramp for YEARS and overlooked it a dozen times. This time, however, I had an epiphany.
It’d make an awesome shabby chic plant stand for the coffee cups!
Now I needed to find something to lean it up against, and chose a Brazilian Pepper Tree that we never really liked ‘cos it’s invasive, but it’s been here since the house was built, and the birds like it — because of that, so far it’s been spared. You can’t really grow anything under it (that’s only one of its problems) and the roots protrude and are gnarly.
Think Oklahoma dust bowl. Think Grapes of Wrath. That’s exactly what that neglected little area brings to mind. It was time to render a little aid and LOVE.
I filled the mugs with succulents that I already had growing in the garden.
View from the deck: A perfect location to turn into a bohemian hippie focal point.
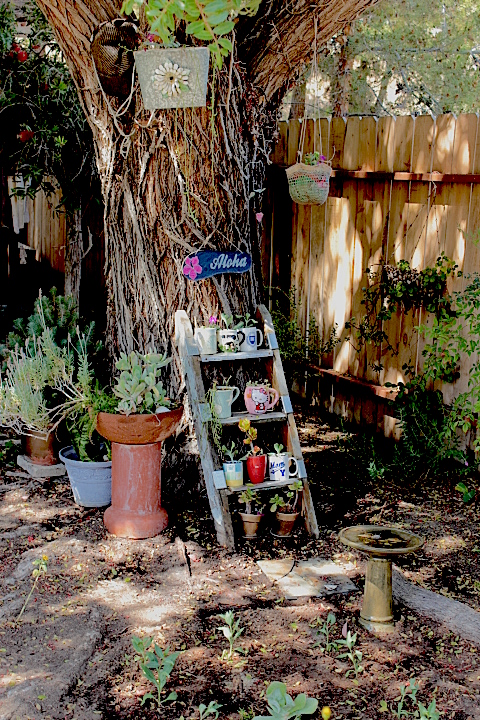
 I planted a square of Jupiter’s Beard from seedlings I propagated; it’s a drought tolerant plant with lush pink flowers — really easy to grow, and it’ll fill in an otherwise kind of ugly and barren spot.
I took a bird bath from the front yard and an assortment of other planters gathered from the garden and clustered them all together to create visual interest. The worn and broken tiles add to the shabby chic feel.
Bonus upcycle DIY: Turn an old hat into a planter by cutting off the frayed brim and attaching twine. So simple to set inside a pot of colorful flowers; hang and enjoy!

You can never have too much aloha spirit!
Share your best up/recycle #DIY project.