Kid-Friendly Crafts | DIY Bouncy Ball

Especially now that days are longer and it our brief rainy season is almost over, this looks like a really fun and educational craft to do with the Angels– in the garden, definitely NOT indoors.

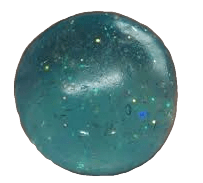
The photo isn’t mine, but this is what I hope ours will look like. I’ll definitely use glitter glue.

A while back I got some borax for another craft that we never tried (snowflakes with pipe cleaners), but this project definitely looks like something everyone would enjoy.

Ingredients
1/2 cup warm water
1 tablespoon borax powder
1 to 2 tablespoons clear Elmer’s glue (glitter glue works too!)

INSTRUCTIONS

Step 1: Make the borax solution
Pour 1/2 cup of warm water into a bowl.
Stir in 1 tablespoon of borax powder until it is completely dissolved.

Step 2: Add the Glue
Slowly pour in 1 to 2 tablespoons of glue, depending on how big you want your bouncy ball.
If using glitter glue or colored glue, this is where the fun begins!

Step 3: Form the Ball
As soon as the glue touches the borax solution, it will start to solidify.
Use your hands to squeeze and shape the mixture into a ball.
If the ball feels too sticky, dip it back into the borax solution for a few seconds, then continue shaping it.

Step 4: Let It Set
Once the ball is smooth and holds its shape, set it aside to dry for a few hours.
As it dries, it will become even bouncier and more solid.
Experiment with different types of glue – Clear glue gives a translucent ball, while glitter glue adds sparkle.
Don’t overwork the mixture – Knead it just enough to form a ball, but too much handling can make it less bouncy.
Store properly – Keep your bouncy ball in a sealed plastic bag to prevent it from drying out.

The educational science experiment part of this project…
The glue contains polyvinyl acetate (PVA), a liquid polymer. When mixed with borax, the PVA chains link together, forming a rubbery texture. This cross-linked structure is what makes the ball firm yet flexible, giving it the ability to bounce.

Hearts + Seashells = Love

World of Love Hearts

I’m going to use this as a template for my next seashell craft.

I love the way it incorporates rocks, too. I haven’t felt inspired like this since I first made several seashell bouquets, and I’ll post a tutorial when it’s finished.

First, I have to decide if I’m going to frame it or hang it by a ribbon, so that’ll determine what kind of base is needed, and now that I’m thinking about it, this will be a great project for the Angel Kids, too. Seashells really do equal LOVE!

Happy Saturday!

Seashells in Bloom 🐚

From Casa de Enchanted Seashells….Happy Father’s Day to all the good dads in the world! 🐚

Whether it’s a Chanel or a seashell, they both bring me joy.

Since I’m woefully allergic to most cut flowers like roses and stargazer lilies, I’m rarely able to have vases full of sweet smelling blooms to decorate every room, but I do have hundreds of seashell treasures, collected by me or presented as gifts.

This is the very last freesia of the season; she’s so precious that I had to bring her in so I could marvel over her color and fragrance, but I had to place far away her from me or I’d start sneezing. As you can see, she’s happily resting among a few of my other seashell friends.

I’ve never really figured out why I love seashells as much as I do, but I learned that some people associate seashells with love and fertility. Some also believe they represent the safe journey between the physical and spiritual world, while seashell jewelry is supposed to bring good luck and to protect the spirit of the wearer.

I’m not super creative like everyone on Etsy and Pinterest, but I do like to embellish almost everything with shells and rocks.

Here’s how to make the seashell bouquet:

  • Get craft sticks of all sizes; I even used chopsticks.
  • If you don’t have a glue gun, get one! I can’t live without mine, that’s for sure. For this project, you don’t have to be perfect, obvs you need to use more glue for the heavier starfish.
  • Florist’s foam (the green stuff) makes it really easy to place the sticks exactly where you want them and they’ll be stable.

I’m pleased with the results.

I liked the idea of a seashell bouquet so much that I made another one; more rustic, in a vintage frog vase (Majolica? McCoy?) from an antique store. This time I used sticks from the garden to attach the seashells.

And because I was inspired by the seashell bouquets, I started a more intense project. With my handy glue gun and a lot of glue sticks, this entry mirror took a longer to complete than I thought it would, but I’m happy with the outcome.

Enchanting Seashell Bouquets

For #ThrowbackThursday, I reached into the vault of previously written posts and found this one from 2012.

I reworked it a bit and added a few more photos of the seashell bouquets that I’ve crafted since then.

At the time, I needed a new project and somewhere. probably on Pinterest, I saw a bouquet of seashells and starfish and thought that it looked easy enough to re-create, so I did!

An added benefit to the seashell bouquet is to make as a gift for anyone who’s allergic to flowers. The irony here is that I’m allergic to roses. With a name like Rosebud, that’s pretty funny, not that I’d toss them out if someone wanted to send me a dozen, but we can’t be in the same room at the same time.

How to make the seashell bouquet:
1. Get craft sticks of all sizes; I even used chopsticks.
2. If you don’t have a glue gun, get one! I can’t live without mine, that’s for sure. For this project, you don’t have to be perfect, obvs you need to use more glue for the heavier starfish
3. Florist’s foam, that would be a good idea and it’s easily available at craft stores and the dollar store, which is where I got mine.
4. It’s pretty simple: glue the seashell or starfish or sparkly treasure to the stick.
5. Insert into foam cut to fit snugly inside the vase.
6. Done!

Voila! Here’s the finished product. This vase is at the bottom of our stairs up to the second level and is the first thing you see when you come in the front door. 

I used sticks from the garden because I wanted a natural, organic creation. The vase came from a vintage consignment shop in the village.
The vase came from Anthropologie; I embellished it with the seashell collar. Yay for glue guns!

Are you crafty? Let me know what you’ve been doing all the many months of being isolated during the Covid Pandemic. The next time I get to see Angel Boy 2.0, I think he’s old enough to help me make one, and I think he’d love to create a seashell bouquet. Of course, he’s still too young to use a glue gun, other than that, it’s a great project for children.

How To Recycle Old Coffee Mugs #DIY #Project

It’s SPRING!

What a great time to freshen up the yard with a totally 100% free project using items we already had. re_up cycleDon’t throw away those cracked cups with broken handles!

We all know I’m a collector of things, whether it’s empty boxes (‘cos you never know when you might need one) or bathrobes ( I have about fifty of them) or seashells (of course!) — and all the rest: shoes, jewelry, books…

I’m also a breaker of things — like coffee mugs and wine glasses.

At any given time, I have half dozen injured/wounded/disabled cups that’re in various stages of rehab.

Most of the repaired cups and mugs aren’t really usable for holding hot liquid, but I’ve held onto them because I love them and they’re special to me…Hello Kitty, Yale Mom, and the ones with seashell motifs — I mean, how can I just toss these guys in the trash?

One fine Sunday afternoon, I felt the itch to start another DIY project but nothing specific came to mind — just thought I’d wander around until something sparked interest — then I discovered an old boat ramp behind our greenhouse (not sure what boat it came from). I’d seen this ramp for YEARS and overlooked it a dozen times. This time, however, I had an epiphany.

It’d make an awesome shabby chic plant stand for the coffee cups!

Now I needed to find something to lean it up against, and chose a Brazilian Pepper Tree that we never really liked ‘cos it’s invasive, but it’s been here since the house was built, and the birds like it — because of that, so far it’s been spared. You can’t really grow anything under it (that’s only one of its problems) and the roots protrude and are gnarly.

Think Oklahoma dust bowl. Think Grapes of Wrath. That’s exactly what that neglected little area brings to mind. It was time to render a little aid and LOVE.

I filled the mugs with succulents that I already had growing in the garden.

View from the deck: A perfect location to turn into a bohemian hippie focal point.

coffeecuplanter3jupitersbeardI planted a square of Jupiter’s Beard from seedlings I propagated; it’s a drought tolerant plant with lush pink flowers — really easy to grow, and it’ll fill in an otherwise kind of ugly and barren spot.

I took a bird bath from the front yard and an assortment of other planters gathered from the garden and clustered them all together to create visual interest.  The worn and broken tiles add to the shabby chic feel.coffeecupplanters

Bonus upcycle DIY: Turn an old hat into a planter by cutting off the frayed brim and attaching twine. So simple to set inside a pot of colorful flowers; hang and enjoy!
coffeemugplanter1

You can never have too much aloha spirit!

Share your best up/recycle #DIY project.

DIY Part Two: Outdoor Swing Canopy Sewing Project

closeupcushionDo-it-yourself…This is the second part of the project — I recovered the torn cushion — click HERE for that DIY post.

After that refurbishment, it was clear that I needed to find a way to create a matching canopy. There was no way I could be satisfied with two different patterns and color schemes.

There are tons of online tutorials, but I decided to freestyle it — I took a bunch of measurements and went back to JoAnn‘s Fabrics.

First I cut and pinned the striped material to the top; then I hemmed all the raw edges; repinned, and sewed it all together. It was sooo difficult to work with that much canvas material, especially the way it bunched up on the sewing machine, but I persevered because I’m stubborn that way.

It feels good to try new things, but I’ll definitely NOT take on this project again!

The corners were tricky…but from far away it looks fine!
swingcanopycloseup

Under the shade of a non-fruiting mulberry tree…with an orange orchid photobombing the picture.

swing canopy

It looks great if you don’t get too close…matching up the stripes is always a challenge; one side’s perfect — the other not so much. Oh well…

swingcanopy2

What do you think? Have you ever tackled a job or a project even though it’s incredibly difficult? Were you proud of yourself for meeting the challenge or did you give up before it was completed?