My Kintsugi DIY Project

Kintsugi is a Japanese method for repairing broken ceramics with a special lacquer mixed with gold, silver, or platinum.

The philosophy behind the technique is to recognize the history of the object and to visibly incorporate the repair into the new piece instead of disguising it.

The process usually results in something more beautiful than the original.

Kintsugi is rooted in the Japanese philosophy of wabi-sabi, which appreciates the beauty of imperfection and impermanence. It encourages embracing flaws and seeing them as part of a unique history rather than something to be concealed. 

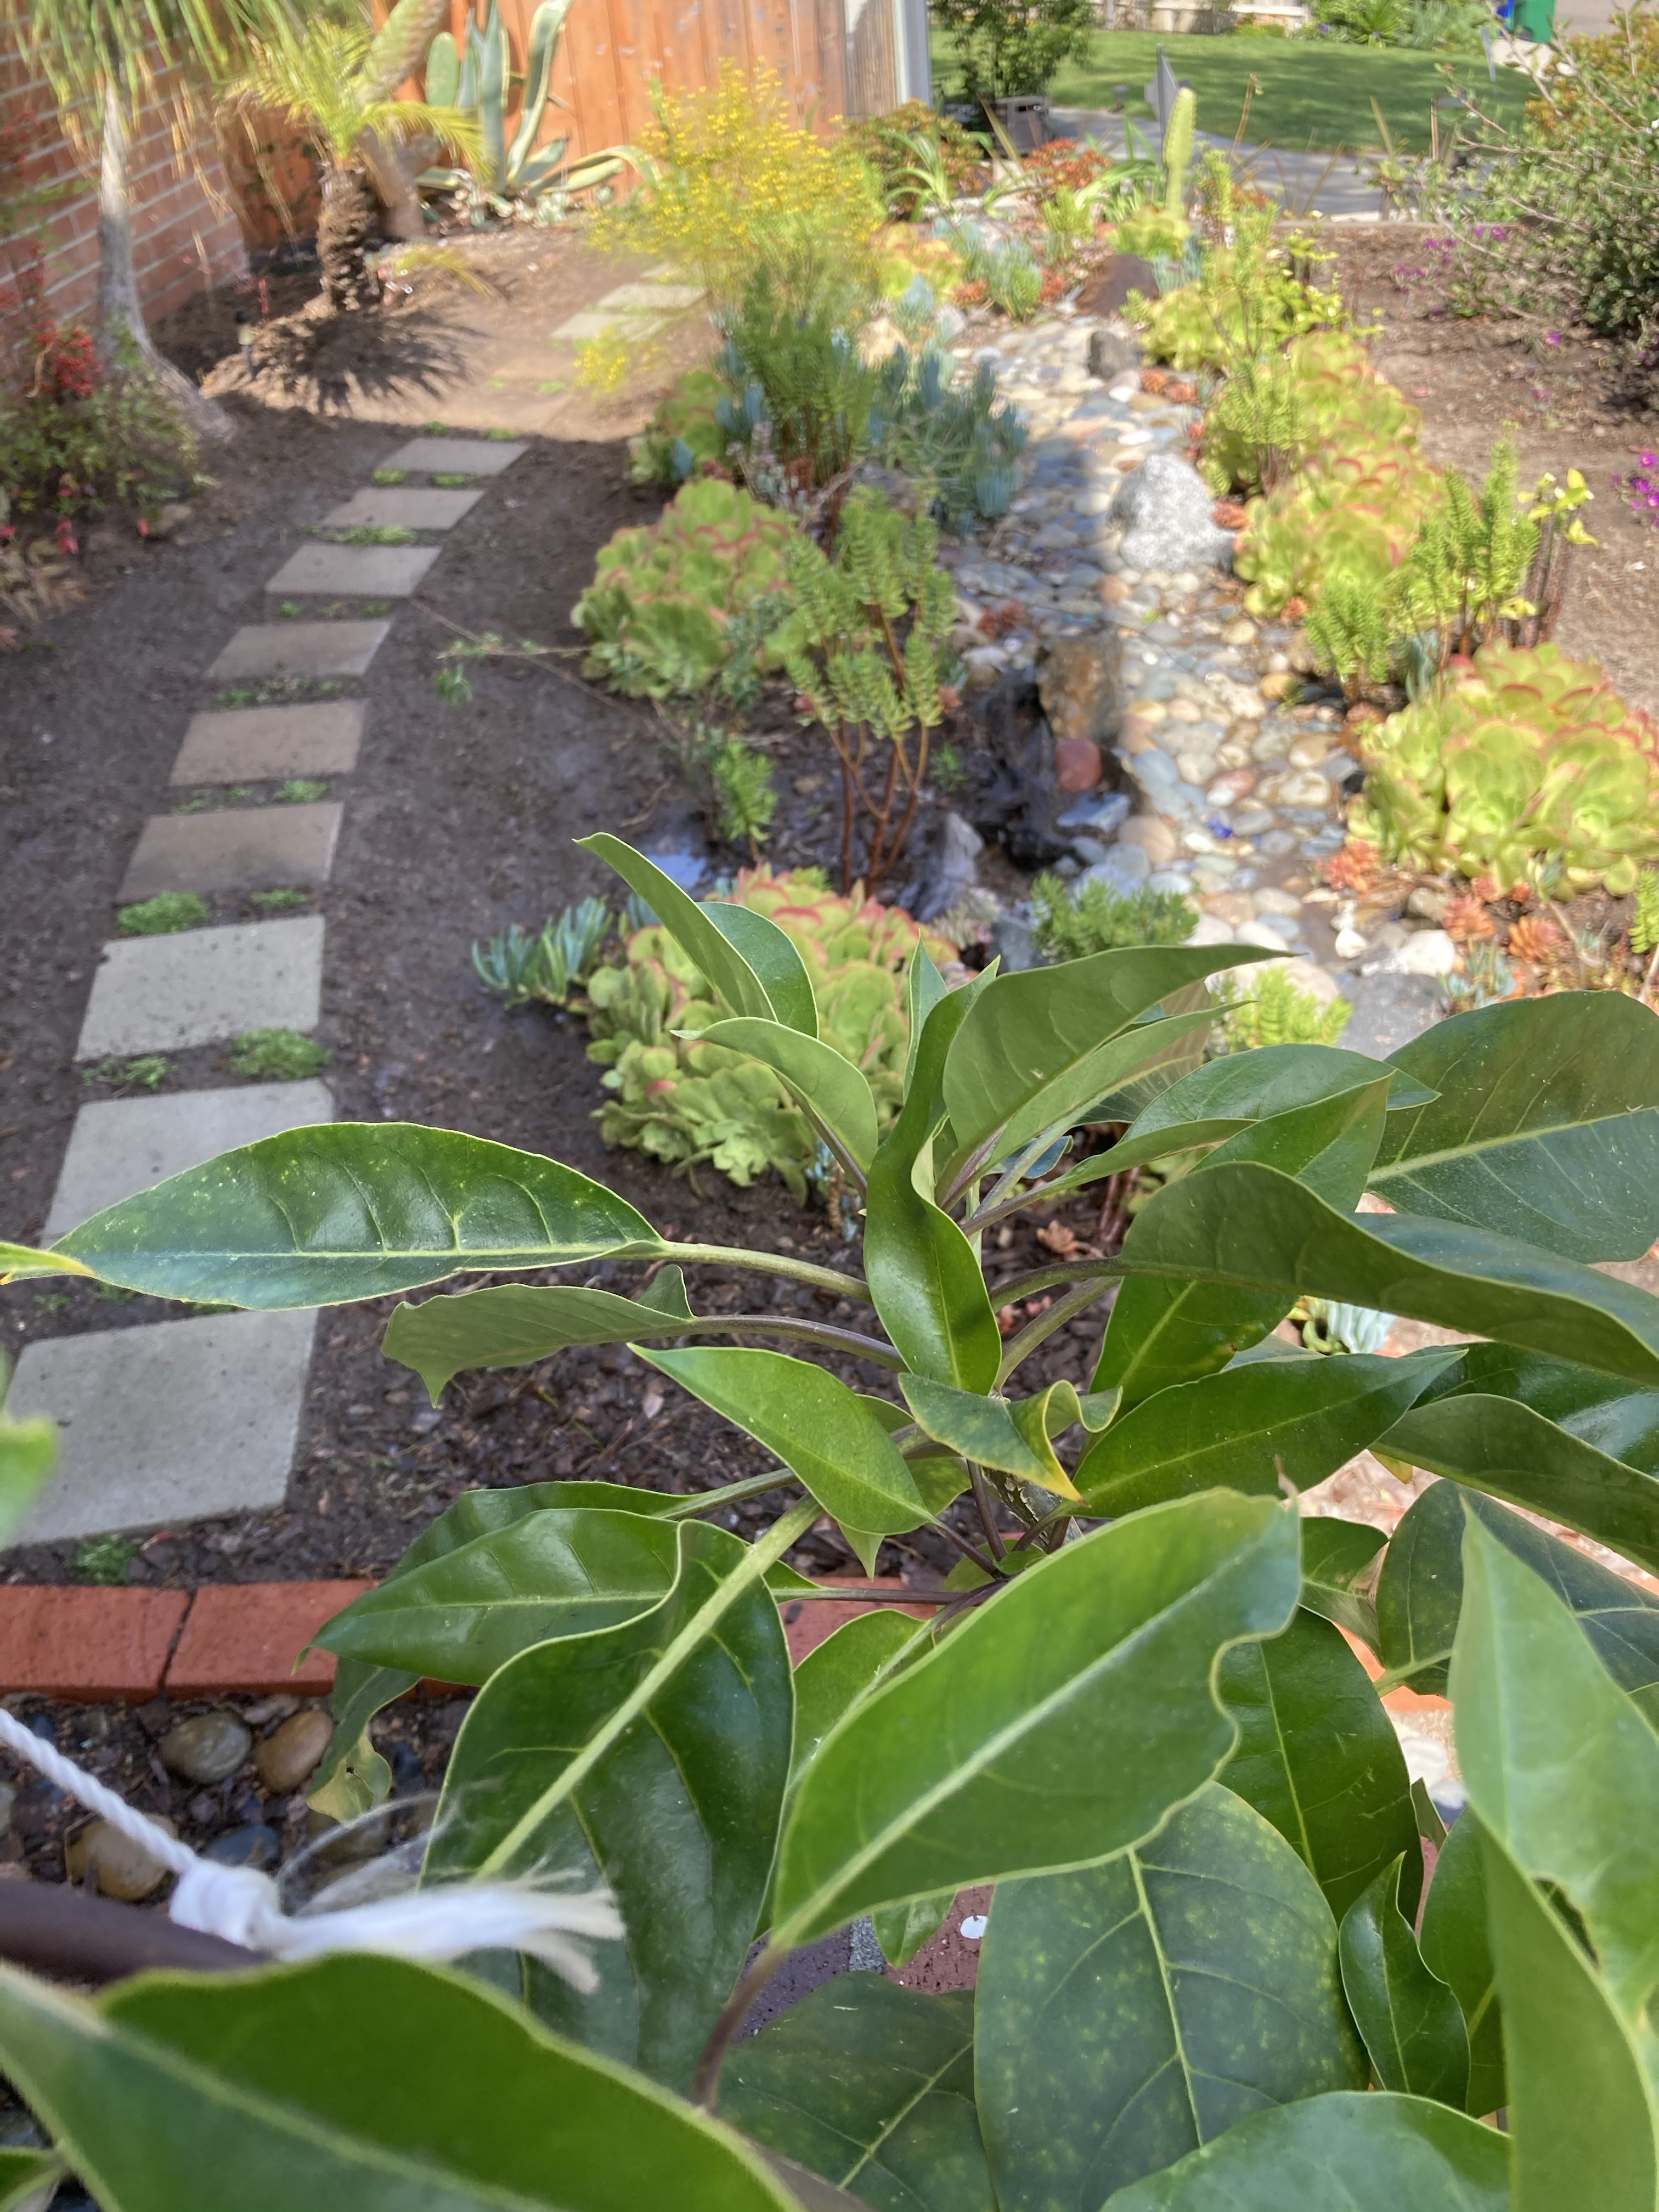
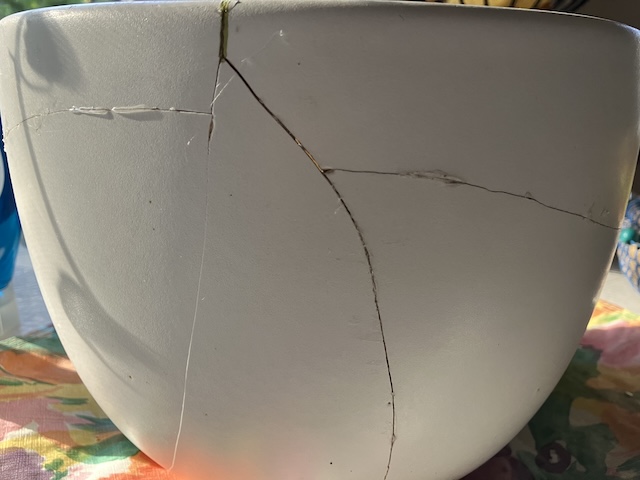
When I had my recent fainting (syncope) episode, my fall smashed one of my favorite planters. It was white, simple, pure, and had a twin, which makes my OCD happy. When I cleaned up the mess, I saved the broken pieces. I wasn’t sure what I could do with them but I wasn’t ready to toss it out, especially as it created an imbalance with its sibling.

Yesterday, finally, I decided to see if I could repair it. I used E6000 to glue all the pieces back together. I thought I could use it outside in the garden even if it was too destroyed to be brought back in the house. It didn’t look great, but then I remembered that I had a gold permanent marker.

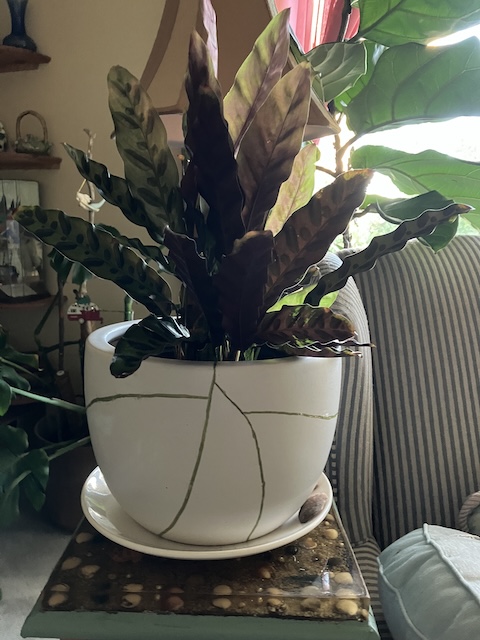
Instead of hiding the damage, I used the kintsugi concept and revealed the beauty in its brokenness.

I love the way it looks and the rattlesnake plant is once again displayed in a perfectly, now imperfect setting.

I know you can buy kintsugi repair kits, but my little gold marker did a great job.

While traditionally used for ceramics, the philosophy of kintsugi has been applied to various aspects of life, including personal healing. It offers a perspective on how to find beauty in the brokenness and learn from life’s experiences. 

Since I break things all of the time, I’m fairly certain I’ll be able to attempt more kintsugi in the future. I’m slightly tempted to break something on purpose. I won’t, but maybe I will!

Kid-Friendly Crafts | DIY Bouncy Ball

Especially now that days are longer and it our brief rainy season is almost over, this looks like a really fun and educational craft to do with the Angels– in the garden, definitely NOT indoors.

The photo isn’t mine, but this is what I hope ours will look like. I’ll definitely use glitter glue.

A while back I got some borax for another craft that we never tried (snowflakes with pipe cleaners), but this project definitely looks like something everyone would enjoy.

Ingredients
1/2 cup warm water
1 tablespoon borax powder
1 to 2 tablespoons clear Elmer’s glue (glitter glue works too!)

INSTRUCTIONS

Step 1: Make the borax solution
Pour 1/2 cup of warm water into a bowl.
Stir in 1 tablespoon of borax powder until it is completely dissolved.

Step 2: Add the Glue
Slowly pour in 1 to 2 tablespoons of glue, depending on how big you want your bouncy ball.
If using glitter glue or colored glue, this is where the fun begins!

Step 3: Form the Ball
As soon as the glue touches the borax solution, it will start to solidify.
Use your hands to squeeze and shape the mixture into a ball.
If the ball feels too sticky, dip it back into the borax solution for a few seconds, then continue shaping it.

Step 4: Let It Set
Once the ball is smooth and holds its shape, set it aside to dry for a few hours.
As it dries, it will become even bouncier and more solid.
Experiment with different types of glue – Clear glue gives a translucent ball, while glitter glue adds sparkle.
Don’t overwork the mixture – Knead it just enough to form a ball, but too much handling can make it less bouncy.
Store properly – Keep your bouncy ball in a sealed plastic bag to prevent it from drying out.

The educational science experiment part of this project…
The glue contains polyvinyl acetate (PVA), a liquid polymer. When mixed with borax, the PVA chains link together, forming a rubbery texture. This cross-linked structure is what makes the ball firm yet flexible, giving it the ability to bounce.

Hearts + Seashells = Love

World of Love Hearts

I’m going to use this as a template for my next seashell craft.

I love the way it incorporates rocks, too. I haven’t felt inspired like this since I first made several seashell bouquets, and I’ll post a tutorial when it’s finished.

First, I have to decide if I’m going to frame it or hang it by a ribbon, so that’ll determine what kind of base is needed, and now that I’m thinking about it, this will be a great project for the Angel Kids, too. Seashells really do equal LOVE!

Happy Saturday!

Honest Review: Zoflora Concentrated Disinfectant

I’m always on the hunt for the best cleaning products and I was truly excited when I learned about Zoflora from my British DIL.

If it can disinfect and successfully clean up after my two feral grandkids, that’s all the recommendation I need!

I don’t know the reasons why, but the UK often has better products (and TV shows) than we do here in the States and this popular cleanser is one of them, proudly claiming to have been made in Yorkshire since 1922.

I’ve always cleaned with Lysol and PineSol because that’s what my mom used and while they definitely do the job, I’m pleased with Zoflora’s results, plus it’s a nice change from the piney medicinal smell.

Here’s an interesting fact: Zoflora was originally developed to kill germs and eliminate odors in public spaces like dance halls and cinemas.

The fragrance is a beautiful arrangement of exquisite rose and rich violet, with layers of white musk, precious woods and hints of green citrus.  

My DIL’s mom brings her a couple bottles when she visits because we thought it wasn’t available here, but I found some at Walmart online and quickly placed an order which should arrive this week.

It’ll be enough to last a while because it’s concentrated. In a spray bottle, dilute one capful of Zoflora to 400 ml/ 13.5 ounces of water. Generally, dilute one part Zoflora in forty parts water for larger cleaning jobs.

If you have pets, be extra careful using this product. Always ensure pets are excluded from the area when using Zoflora, don’t let your furry family onto newly treated floors or surfaces until they are completely dry. FYI: Zoflora products are not suitable for use in aquariums, vivaria, or other housing where reptiles are kept.

Zoflora Concentrated Disinfectant, a multipurpose disinfectant:

  • Zoflora kills 99.9% of bacteria and viruses such as E-Coli, Salmonella and Influenza
  • Zoflora contains patented odour elimination technology, and our fragrances are tested to last at least 24 hours, leaving your home beautifully fragrant
  • Zoflora disinfectant can be used on floors, baths, tiles, taps, worktops, drains, dishcloths, toilets & potties. Safe for use on hard surface pet areas.
  • Zoflora is a concentrated disinfectant that can be used neat or diluted in water. 500ml of Zoflora makes almost 20L of full-strength disinfectant.
  • Our fragrances are crafted by expert perfumers with premium ingredients to bring luxurious scents to your home. 
  • https://www.zoflora.co.uk/

Since it seems as if the rains are over and we’re back to normally dry SoCal weather, it’s time to wash the windows, screens, and tracks — and initiate other heavy spring cleaning projects inside and out. I can’t wait to pull on my rubber gloves and begin scrubbing (said no one ever except me haha!).

**This is an honest review. I did not receive any product or compensation from the company. I have used Zoflora myself and wanted to share my positive experiences.

Rocky Beach

I got up super early and went to the part of the beach that never fails to provide a variety of plentiful rocks for all my projects. This time was no exception. The irony is that there are no seashells here; only rocks. My local beaches aren’t known for seashell collecting, but rocks are welcome treasures, too.

There was the bluest of sunny skies but it was windy and sand was blowing all over the place from another mild Santa Ana.

I was able to find all the rocks I needed, joined by an audience of seagulls and shorebirds. It was so early there were few humans so we had the beach to ourselves.

Every rock is so beautiful and unique; I have a hard time choosing who comes home with me. Just look at them!

DIY Project: Brick Patio

Do you have any idea how much 72 bricks weigh? Me and my sore back can tell you they weigh in excess of 300 pounds. Ouch. But it was worth it; take a look.

Like I was gifted the beautiful dollhouse, I was also given two outdoor chairs and that created a happy dilemma.

Where should they go? Where is the perfect location for these adorable red chairs?

The backyard gardens had plenty of seating so I took a good look at the front yard and found a perfect spot in the corner where two fences meet and create a sort of alcove.

I thought it would be a cute place for the angels to have a tea party.

After giving it a lot of thought, I decided to make a 4 x 4 brick patio. I thriftily repurposed bricks from another garden project that no longer brought me joy.

Thanks to a brick calculator and not my math-challenged brain, it appeared that I would need 72 bricks. I didn’t have that many, so I purchased 20 bricks and a bag of sand. The cost of this entire project was less than $20.

The bag of sand weighed 50 pounds and that’s my absolute lifting limit. I almost tore my arms out of their sockets carrying it from the car. But I did it.

The real work was preparing the location, which was on a slight slope and didn’t easily cooperate. Yes, I used a level but I’m also challenged in that area too, so it didn’t really make sense to me and I gave up after a few frustrating attempts.

As I said to many neighbors that walked by and watched me, I was doing my normal half-assed job. I know there are proper ways to do it right with the level and string and stakes blah blah blah, but I literally didn’t care. I wanted to get it done so I could start to decorate.

Before:

I needed to leave that horrible old cactus for two reasons: 1. It’s holding up the fence which somehow separated from the wall. 2. It’s security because no one would even think to try and climb over it.

I went to the nursery and bought a raspberry plant which I anticipate will entwine with the cactus and mask it. I also planted more of my snow peas and their lovely green leaves and pods will create a secret garden atmosphere. In the far corner, I transplanted a fast growing Cup of Gold (Solandra maxima) vine with gigantic yellow flowers.

It took three days to finish, but it’s DONE except for the solar fairy lights that will arrive tomorrow.

As soon as the stores start to carry their spring/summer items, I’ll replace that white table with something else, but it’s OK for now. I definitely need more rocks so that means I need to make a trip to the rock beach.

All in all, if you ignore the uneven bricks, it’s perfect, at least for me!

DIY: Embellishing the Ordinary

When I’m sad or melancholy, I shop. When I’m happy, I shop. It’s an all purpose panacea that works for me, no matter what. They don’t call it retail therapy for nothing.

I was out and about browsing in all my usual haunts from Ross to TJ Maxx to the Rack.

I didn’t find much except for a pair of Laura Ashley slippers. I love to wear slippers; I have a closet full of them from animal print to sequin-studded to a couple pairs of Hello Kitty slippers that were gifts. I don’t have any babouches, those flat Moroccan slippers, but I have mostly every other style.

I brought home these pillow-soft, ballet-pink slippers and determined that something was missing. They’re super soft and comfortable but they needed some enchanted style embellishment to become perfect.

The white bow didn’t work for me. It seems to me that Laura Ashley could have really taken it up to another level if they had given it a bit more thought.

I removed the bows and drove to a fabric store.

I was thinking about a pompom to look like a little bunny, but then I spied a fabric flower with a rhinestone center. I had to have it.

Luckily, there were two, so I brought them home. Even more fortuitous for me is that they already had a pin mechanism on the back so I can take them off when I throw the slippers into the washing machine.

HAPPINESS!

After I attached the flowers, I was feeling satisfied with myself and I know I’m a little strange, but I felt like a princess walking (still limping) through the house with my adorable slippers.

In fact, I love them so much, I created a little photo sesh with different backgrounds. Definitely fit for royalty.

On animal print.
On a soft and furry blanket.
Draped in pearls and gems.

Low cost fun for me. Slippers: $7.99
Flowers: $8.00 for the pair as they were on sale.

My joy: priceless, because I’m easy to please.

Embellishing the ordinary is my special talent. There is beauty all around.

LOVE!

DIY Garden Paver Project: Stepping Stones

This simple DIY project reallyreally exacerbated my OCD issues. However, I was determined NOT to give up until my inner demons were soothed.

The fifth time was a charm, at least I think so. I’m not good at math but I used sixteen pavers with the exact same distance between each one. The middle of the arch aligned perfectly with the big living room window and that made me SO happy. It’s a nice transition between the pygmy palms and the ponytail palms and my dry river bed. I realize the standard rule is to leave 24 inches between each paver or stone, but I’m short and that’s a big leap for me, ergo the reason why they are so close together.

I have an unending supply of these adorable little mounding succulents that are ideally suited to completely fill the spaces between the pavers. If I remember correctly, it’s a kind of spreading sedum and seems to love it in my backyard garden. It won’t take long for them to grow.

I thought about painting or stenciling the gray concrete but it would have spoiled the theme of the dry river bed. The rest of my front yard is planted with California natives; coyote bush, sages, buckwheat, and this gigantic Rhus integrifolia, also known as lemonade sumac or lemonade berry. It began life as a one gallon plant and must really love it in that spot because it’s as big as the house!

(I probably don’t need to tell you that you wouldn’t want to be here when I hang a picture on the wall.”Move it just a bit to the right, I mean to the left; up a tiny bit. OK. PERFECT.”)

DIY: Sewing a Chelsea Collar

I found these three adorable dresses for Angel Girl at our local resale shop. I brought them home to wash, disinfect, and iron.

May be an image of outdoors

But something was missing. They needed an embellishment to become perfection. The kitty cat dress didn’t seem to need it, but the other two did.

They needed a collar! While Peter Pan collars add a modern yet retro vintage touch, in order to be called a Peter Pan type, it would need rounded edges. What I created is more of a “Chelsea” collar with pointed edges.

This was a fun and easy project. I downloaded a free template and then I had a brilliant thought. To make this project even easier, I could simply cut out and attach different types of lace. This would keep the actual sewing to a minimum; no fabric, no turning of the collar. EASY!

I went to Jo-Anns and found the right material to complement both dresses. Thrifty girl that I am, each piece cost about two dollars.

The next step: Cut out and pin the collars to the dress. Make sure to allow enough room to turn/sew the raw ends under.

Finally, sew the collar to the dress at the neck. It can be done by machine or by hand. This time I used my sewing machine. I have a very old machine and it needs a tune up as it’s acting up a bit, but since it weighs about fifty pounds, I haven’t wanted to fight with it to bring to the repair shop.

This is the finished product. I added the contrast of narrow blue satin ribbon and a bow.

I love this one too. The eyelet lace perfectly enhances this bright and beautiful party dress. With Char’s titian hair, it will look AMAZING.

Now I’m searching in my own closet for a dress that needs an embellishment because I’m obsessed with collars!

Enchanting Seashell Bouquets

For #ThrowbackThursday, I reached into the vault of previously written posts and found this one from 2012.

I reworked it a bit and added a few more photos of the seashell bouquets that I’ve crafted since then.

At the time, I needed a new project and somewhere. probably on Pinterest, I saw a bouquet of seashells and starfish and thought that it looked easy enough to re-create, so I did!

An added benefit to the seashell bouquet is to make as a gift for anyone who’s allergic to flowers. The irony here is that I’m allergic to roses. With a name like Rosebud, that’s pretty funny, not that I’d toss them out if someone wanted to send me a dozen, but we can’t be in the same room at the same time.

How to make the seashell bouquet:
1. Get craft sticks of all sizes; I even used chopsticks.
2. If you don’t have a glue gun, get one! I can’t live without mine, that’s for sure. For this project, you don’t have to be perfect, obvs you need to use more glue for the heavier starfish
3. Florist’s foam, that would be a good idea and it’s easily available at craft stores and the dollar store, which is where I got mine.
4. It’s pretty simple: glue the seashell or starfish or sparkly treasure to the stick.
5. Insert into foam cut to fit snugly inside the vase.
6. Done!

Voila! Here’s the finished product. This vase is at the bottom of our stairs up to the second level and is the first thing you see when you come in the front door. 

I used sticks from the garden because I wanted a natural, organic creation. The vase came from a vintage consignment shop in the village.
The vase came from Anthropologie; I embellished it with the seashell collar. Yay for glue guns!

Are you crafty? Let me know what you’ve been doing all the many months of being isolated during the Covid Pandemic. The next time I get to see Angel Boy 2.0, I think he’s old enough to help me make one, and I think he’d love to create a seashell bouquet. Of course, he’s still too young to use a glue gun, other than that, it’s a great project for children.