What Is a Mom?

I’ve always thought that being a mom is a neverending labor of love.

After Angel Boy 2.0 was born, DIL coined the phrase, “Live to serve, serve to live”, and that became doubly true when Angel Girl 2.0 entered this world.

I think it’s sad that some mothers weren’t born with the unconditional love gene, and I wonder what their reasons were for even having children, because once you’re a mom, life ceases to be centered around SELF, and will instead be forever all about one’s children.

With all the rampant narcissism in this world, I grieve for the children who don’t experience heartgiving love.

But…Mother’s Day is all about ME, and I choose to extol my mommy-ness by agreeing with the original Angel Boy who claims the day for himself because, if not for HIM, I would have no reason to celebrate, and he’s right!

No matter how old he is, he’ll always be my very own angel boy.

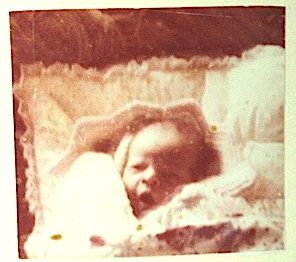
And but for the original Charlotte, I wouldn’t be here, either, so Happy Mother’s Day to my very own always-missed-but-forever mom!

This is the perfect day to raise awareness about ALL mothers of all species.

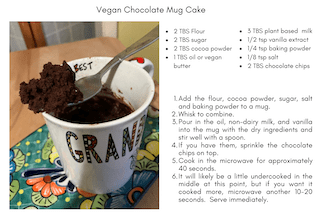
We have the power to help mothers confined and abused on factory farms by adopting a kind and compassionate plant-based lifestyle. 

Did you know that the first few minutes after birth can mark the beginning of a lifelong bond between a mother cow and her calf? Cows carry their young for nine months and they nurse them for nine to twelve months, much like human mothers. Their babies don’t deserve to be stolen from their moms so humans can consume the milk that wasn’t ever meant for us.

Chicks bond so closely with their mothers that scientists call it “imprinting.” Mother hens take their chicks under their wings, providing protection and shelter, and chicks spend their first few weeks learning to scratch for food by watching the techniques of their mothers.

Pork producers confine mother sows in crates so small they can’t move without scraping against the rails.

Oh, and wolves are wonderful, caring, loving moms, too.

To paraphrase Maya Angelou, When we know better, we need to do better.

Go VEGAN.

Happy Valentine’s Day

Image

Easy Vegetable Soup + Best Ever Focaccia, The Star of The Show!

I hope everyone enjoyed a peaceful Christmas as we count down to 2026! Here in SoCal, we had 56 mph wind gusts along with heavy rain for most of Christmas Eve, which made for a cozy holiday.

It seemed like a great time to choose soup as a first course. For whatever reason(s), as often as I make variations of this recipe, the end result is inconsistent. Sometimes it’s great, sometimes NOT.

This time, I nailed it! The flavor was absolutely PERFECT, exactly what I had hoped for, and I decided to dust off my baking chops and make individual herby focaccias to accompany it.

I don’t know if it’s because of their diminutive size or the infused herbal fragrance, but these are seriously the best — every single bite is simultaneously crusty and chewy — flawless perfection.

I tend to make gigantic batches of soup, enough to feed an army, so this time I thought I’d scale it down to a more manageable amount.

Easy Veggie Soup
🌿 Saute 1/2 onion, a couple ribs of celery, and 1/2 bell pepper.
🌿 When onions are translucent, add two teaspoons of vegan Better Than  Bouillon.
🌿 Cook for a few minutes and add 8 cups of water, along with two bay leaves.
🌿 Add two or three sliced carrots.
I think this is where the magic happened. For some reason, I was out of tomato paste AND canned tomatoes. I didn’t feel like going to the store and was lucky enough to find a jar of marinara sauce in the pantry so I added about 3/4 cup, stirred, and brought it back to a low simmer.
🌿 Let it cook for a couple hours or so, adding more water as necessary.
🌿 Cut one or two potatoes into bite sized pieces and add along with a can of beans (any kind will work, I used garbanzo beans).
🌿 Simmer until potatoes are soft, adding more water as needed for desired soupiness.
🌿 Finally, add 1/2 cup alphabet pasta, some garden herbs, a bit of Hawaiian sea salt and pepper.
Options: Add cubed tofu, more beans…or blend for a smoother consistency.

🌿🌿🌿 🌿🌿🌿 🌿🌿🌿 🌿🌿🌿 🌿🌿🌿 🌿🌿🌿 🌿🌿🌿 🌿🌿🌿 🌿🌿🌿 🌿🌿🌿

Individual Focaccia
*
1 teaspoon active dry yeast
* ¾ cup warm water 
* 1 ⅔ cups all-purpose flour
* ¾ teaspoon sea salt
* 1/2 teaspoon sugar
* 2-3 tablespoons olive oil. I use avocado oil because I don’t really like the taste of olive oil. Flaky salt for topping. I chopped some of the same garden herbs: sage, chives, oregano, thyme added to the soup.

* Add the yeast to a medium bowl, then pour the warm water slowly over it. Let the mixture sit for five minutes to allow the yeast to activate.
* Add the flour, sea salt, and sugar to the yeast mixture and stir together until it forms a shaggy dough. It’ll be sticky, so you can use a bench scraper or silicone spatula. Although hands work great, too, it’s messy.
* To develop gluten, fold the dough over itself a few times until it’s stretchy and no longer shaggy.
* No kneading necessary!
* Cover the bowl with a kitchen towel or plastic wrap, then set in a warm place to rise for about an hour or until doubled in size.
* In a square 8 inch baking pan or a couple smaller pans for individual servings, drizzle a tablespoon of the olive/avocado oil to cover the bottom.
* When the dough has doubled in size, transfer the dough to the oiled baking pan(s). Gently spread the dough so that it covers the entire bottom of the pan. Push or lightly stretch the dough into the corners a couple of times to get it to stick.
* Lightly cover the dough and let rise for about 30-40 minutes, until visibly puffy.
* During the last few minutes of proofing, preheat the oven to 425°F
* Drizzle 1-2 teaspoons avocado/olive oil over the top of the puffy dough, along with herbs if used.
* Press your fingertips through the dough to the bottom of the pan and back out to form dimples.
* Sprinkle the flaky salt evenly across the top of the loaf. Bake for about 20 minutes or until brown.
* Remove from the oven and allow to cool in the pan for at least 15 minutes before eating. 

Soup + focaccia makes a great first course or dinner. Add a salad for a complete healthy meal.

Homemade Soft Pretzels: Vegan, Of Course…

It’s been such a reallyreally long time since I baked pretzels that I almost forgot how to shape them, but it all came back pretty quickly as soon as I started rolling.

Pretzels are so easy to make, it’s something everyone should try, especially now that it’s officially fall. I like them simply salted and plain or served with a vibrantly spicy mustard dipping sauce.

Easy Soft Pretzel Recipe

Ingredients

  • 2 and 1/4 teaspoons instant or active dry yeast (1 packet)
  • 1 Tablespoon brown or white sugar
  • 1 and 1/2 cups warm water, not too hot
  • 2 Tablespoons oil or melted vegan butter
  • 1 teaspoon salt
  • 3 and 3/4–4 cups all-purpose flour plus more as needed
  • coarse salt, for topping

Baking Soda Bath
(Some recipes use lye but I think that’s not healthy, so I never have tried it and wouldn’t recommend.)
In a large pot, add 1/2 cup baking soda to 9 cups water, stir, and bring to a boil.

Instructions

  1. Whisk the yeast and sugar into warm water.
  2. Cover and allow to sit for a few minutes.
  3. Whisk in the oil and/or vegan butter and salt.
  4. Add 3 cups of flour.
  5. Mix with a wooden spoon (or dough hook attachment if using a stand mixer) until combined.
  6. Add 3/4 cup more flour until the dough is slightly tacky and pulls away from the sides of the bowl. If it is still sticky, add up to 1/4 cup more flour, one tablespoon at a time.
  7. Knead the dough. Keep the dough in the mixer and beat for an additional 3 to 5 full minutes, or knead by hand on a lightly floured surface for 3 to 5 minutes. If the dough becomes too sticky during the kneading process, sprinkle 1 teaspoon of flour at a time on the dough or on the work surface/in the bowl to make a soft, slightly tacky dough. Don’t add more flour than you need because you don’t want a dry dough.
  8. Shape the kneaded dough into a ball. Cover lightly with a towel and allow to rest for 10 to 30 minutes or longer.
  9. This is a good time to start the water + baking soda boiling.
  10. Preheat oven to 400° degrees.
  11. Line two baking sheets with parchment paper or silicone baking mats. If using parchment paper, coat with nonstick spray.
  12. With a sharp knife, cut dough into twelve equal balls.
  13. Roll the dough into a 20–22-inch rope.
  14. To shape a classic pretzel, roll dough into a long rope, form it into a U-shape with the ends pointing away, then cross the ends over each other twice and bring them down to the bottom of the U, pressing to seal.
  15. There are lots of great YouTube videos that explain in detail how to shape pretzels if you need help.
  16. When the baking soda water has come to a rolling boil, drop 1–2 pretzels in for 20–30 seconds. Any longer than that and your pretzels will have a GROSS metallic taste.
  17. Using a slotted spatula, lift the pretzel out of the water and allow as much of the excess water to drip off. Place pretzel onto prepared baking sheet. Sprinkle the top with coarse sea salt. Repeat with remaining pretzels.
  18. If you want, you can cover and refrigerate the boiled/unbaked pretzels for up to 24 hours before baking.
  19. Bake for 12–15 minutes or until dark golden brown.

I used my stand mixer to knead, placed in another bowl, let rise for about 30 minutes, and cut into 12 equal balls.

Roll to about 22 inches. This is the fun part.

eatlittlebird.com

Not perfectly shaped, but it doesn’t really matter as long as they taste good.

Drop into the boiling baking soda water for only 20-30 seconds. The water isn’t dark gray, not sure why the photo shows that color.

Bake 15 minutes or so depending on your stove.

They won’t win any awards for beauty but they were DELICIOUS.

Tip: Don’t forget to put the salt on before you bake or it won’t stick.

Medievil Hummus Recipe

Enough ugly reality; now we’re back to our regularly scheduled programming of avoidant, happy posts

This isn’t the smooth, creamy dip we know today, but a rustic, nutty dish called Himmas Kassa from a recipe preserved in a medieval 14th-century Egyptian cookbook.

The marriage of ingredients elevates the humble chickpea into a dish worthy of royalty. I’ll definitely make it for Thanksgiving this year.

This is my very own, very basic Hummus Recipe. It’s SO easy! https://enchantedseashells.com/2023/06/14/zesty-veggie-hummus-vegan-pinwheels/

Instead of blended until silky smooth, Himmas Kassa was coarse, full of texture, and mixed with walnuts, fresh herbs, and spices like cinnamon, ginger, and caraway. It was served at banquets as one of the opening courses, to showcase the host’s refinement and generosity.

Recipe

  • 1 cup boiled chickpeas
  • 2 tablespoons tahini stirred with 2 tablespoons water and 2 tablespoons wine vinegar
  • ¼ cup finely ground walnuts stirred with 2 tablespoons lemon juice and 1 teaspoon wine vinegar
  • ½ cup chopped parsley
  • ¼ cup chopped mint
  • 3 tablespoons olive oil
  • ¼ teaspoon each of caraway coriander, black pepper, ginger, and cinnamon, all crushed
  • ½ teaspoon salt
  • For garnish: olive oil, olives, chopped pistachios

Instructions 

  • In a mixing bowl, mash the boiled chickpeas until they form a coarse paste.
  • Stir in the tahini mixture and the walnut mixture until combined.
  • Fold in the parsley, mint, olive oil, and spices. Taste and adjust salt as needed.
  • Transfer to a shallow serving dish. Garnish with olive oil, olives, and pistachios.
  • Serve with flatbread, pita, or crackers. Also delicious spread on tortillas.
  • I’d also serve with carrot sticks and cucumbers, sliced apples and jicama.

https://eatshistory.com/medieval-hummus-recipe-one-of-the-first-recorded-recipes-himmas-kassa/

Featured image courtesy of Pinterest

It’s A Tofu Miracle!

Yes, an actual tofu miracle!

Tofu Tip: Save tofu water; do NOT discard it!

Photo from Pinterest

Tofu water can be used to water plants, add to compost, or as a substitute for aquafaba or other liquids in recipes. 

My mind is completely blown. I’ve drained tofu water ever since I started eating it, and that’s been a long long time.

Truthfully, I never thought it was anything but messy and annoying. Now I’ll save every single drop and tonight, I’ll try a DIY Tofu Facial.

Here’s what I learned: tofu water contains beneficial nutrients like protein, fat, carbohydrates, and minerals (N, P, K) which fertilize plants and promote growth. You can also drink it, use it in soups, or even for DIY facials due to its soothing properties. 

Some things you can do with tofu water:

  • Plant Fertilizer: Pour it onto your houseplants or in your garden to provide nutrients and help them grow. 
  • Compost Additive: The liquid can be added to a compost heap to enhance the organic material and nutrient content. 
  • Aquafaba Substitute: Use it in recipes that call for aquafaba (the liquid from canned chickpeas) as a vegan alternative for binding ingredients in sweets or savory dishes. 
  • Cooking Liquid: Incorporate it into dishes like soups or stocks, especially if the liquid has been reduced to a thicker consistency. 
  • Baking: Add it to the overall liquids.
  • Beverage: Some people boil tofu water with flavorings like vanilla almond milk, stevia, or cocoa for a nutritious drink. 
  • Smoothies: Add to blender with juices, plant milks.
  • Facials: Tofu water contains compounds that can have soothing and calming effects on sensitive skin. 

Let me know if you tried any of those suggestions, or if you plan to!

I Can Do Hard Things But Failed With Sourdough Starters Until Now

I can do hard things but successfully birthing sourdough starter eluded me every single time.

This isn’t funny. One day I say I’m not giving up and the next day I want to toss it out (again) and NEVER try.

I gave myself an ultimatum to attempt it ONE MORE TIME and then give up forever.

Here’s what worked for me: I stopped going crazy following all the scientific recipes and stopped reading the voluminous numbers of posts and pages and websites and YouTube videos dedicated to creating the proper sourdough starter and did it my way, kind of haphazard and casual. I mean if people had been baking with sourdough starters for hundreds of years with zero technology, how difficult could it be?

I’m happy to report that my efforts finally worked. I don’t have any pics of the starter because it’s really not impressive; just a blob of a bubbly and fermenting flour and water mixture.

The real beauty is the reward for my perseverance, I baked it in a standard loaf pan to make it easier to toast. It rose like a cloud and tastes absolutely perfect. Crusty and rustic with a soft, chewy, sour interior texture.

I don’t remember the recipe I followed but the only ingredients are flour, water, salt. It takes a very long rising time, the longer the better for more sour flavor. I let it rise for twelve hours, so it’s definitely not a quick bread, but worth the wait, trust me!

All I have to do now is continue to feed the starter I’ve saved in the refrigerator and I can have sourdough all the time.

Yay for tenacity!

Easy Vegan Chocolate Mug Cake

This is such an easy recipe — just a few minutes mixing and cooking in the microwave.

Since I have zero impulse control when it comes to being able to STOP eating chocolate, and since I was literally dying for some chocolate cake, and knowing my propensity to eat the whole thing, I decided to try a recipe for a single serving microwave chocolate cake.

I choose one of my favorite Grandma mugs…

I have to confess that my very first mug cake was way more delicious than I anticipated! What a pleasant surprise! I will definitely make this again. But to be completely honest, those few bites weren’t quite enough to satisfy my cravings.

Ingredients:

  • 2 tablespoons all purpose flour
  • 2 tablespoons cocoa powder
  • 2 tablespoons granulated sugar
  • 1/8 teaspoon salt
  • 1/4 teaspoon baking powder
  • 1 tablespoon oil or melted vegan butter
  • 3 tablespoons plant based milk or half plant based milk and cold black coffee
  • 1/2 teaspoon pure vanilla extract
  • 2 tablespoons dairy free chocolate chips (I didn’t have any in the pantry.)

Add the flour, cocoa powder, sugar, salt and baking powder to a mug. Whisk to combine.
Pour in the oil, non-dairy milk and vanilla into the mug with the dry ingredients and stir well with a spoon. If you have them, sprinkle the chocolate chips on top.
Cook in the microwave for 40 seconds. It will likely be a little undercooked in the middle at this point, but if you want it cooked more, microwave another 10-20 seconds. 
Serve immediately. 

What’s YOUR Guilty Pleasure?

We still have a few days left in November to observe World Vegan Month and it’s perfect timing to share a guilty snacky pleasure that’s actually guilt-free.

My current guilty pleasure is this: Everything But The Bagel seasoned bite size crackers from Trader Joe’s.

They are crunchily yummy with hummus and flavorfully satisfying all by themselves.

Best of all, they’re vegan (not gluten-free FYI).

Each serving of 14 crackers is 140 calories and contains 3 grams of protein, so it really seems like an innocent indulgence.

What’s YOUR guilty pleasure?

*This is an honest review; I received no free product nor any compensation.

Sweet Potato Brownies | VEGAN

I make these so often, I can probably do it in my sleep. They are always requested by my son and DIL. The kids don’t eat chocolate, so it’s a grownup treat ONLY.

It’s SOOO easy and SOOO yummy.

Even if you’re not #vegan, don’t skip this recipe. I bet you’ll find it’s worth a try, especially if you love chocolate as much as I do.

It was so good, I’ve made it twice. The first time I used only five ingredients:

*Sweet potato, one cup cooked VERY SOFT and mashed
*Nut butter (I used almond), 1/2 cup
*Maple syrup, 1/3 cup
*Vanilla, one teaspoon
*Cocoa, 1/3 cup

Blend all ingredients by hand or in a food processor. Spread in a pie plate or small square baking dish.

Bake at 350 degrees for about twenty minutes. Let sit until completely cool.

If you have the time, the flavors are enhanced if it’s refrigerated or even frozen. I cut them into bite-sized pieces ‘cos it’s really rich.

You don’t actually NEED frosting, but who ever said no to more chocolate? Here’s my best baking hack for that…
https://enchantedseashells.com/2014/09/17/best-baking-hack-ever/

The results can be a bit dense; sometimes I add 1/4 cup all-purpose flour or buckwheat flour. It would also be easy to blend some oats for oat flour, so that’s definitely an option.

YUM. Delicious AND healthy!

P.S. This recipe isn’t overly sweet, so if you want to add more maple syrup or even a LITTLE sugar, go ahead. I thought it was perfect without any additional sweetener, but I’m a choco-holic.