Lemongrass Tea

I have a healthy lemongrass plant in my garden and never thought of doing anything with it but cutting a stalk from time to time for Vietnamese or Thai dishes and thought I’d experiment a little since it I learned it also offers healing benefits. Too bad it can’t fix my broken bones!

Lemongrass tea has a wonderful, lemony, delicious taste. Add to boiling water for only fifteen minutes and it’s a perfect hot or cold refreshment!

If you don’t have fresh lemongrass or you can’t find it in the store, you can use dried lemongrass Be sure to strain or use a tea caddy.

  • 1 stalk lemongrass including leaves (1 tbsp dried lemongrass)
  • 3 cups boiling water
  • Optional: Piece of ginger or sprinkle of cinnamon.

Boil for 15 minutes, steep, strain, and enjoy!

I added a cup of my freshly made lemongrass tea to Yogi ginger tea (which has lemongrass listed as an ingredient) and it tasted yummy!

The Compleat Apple Pie…Deconstructed

Re-posting from a few years ago, one of my faves.

Your apple pie tutorial.
An apple pie with attitude.

If you are one of the many boys and girls (OK, adults) who’ve never made an apple pie from scratch and you don’t want to meet the Grim Reaper without having made at least one perfect apple pie, you’ve come to the right place.

I’m right here, holding your hand, gently walking you through all the steps and twists and turns to create the best apple pie you will ever eat. Guaranteed.

I know you can do it! Once you’ve mastered one pie start to finish, you will never be afraid of a little old piecrust again. Pinky swear.

The Apples
The apples you choose are of the utmost importance. They need to be firm and tart and able to stand up to the heat of a 425 degree oven without becoming mushy as the pie bakes. (For my Canandian friends, you’ll have to do the conversion–I’m not that smart.)

I like Granny Smith or Pippin apples for pies. Normally, that would be the green ones. Depending on the size of the apple, I like to use between 6-8 apples per pie.

apple1
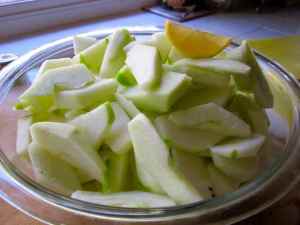
I enjoy making my pies the old fashioned way. I peel and slice the apples.

appe2

Squeeze a little lemon juice over the slices for a pop of flavor and it’ll help keep the apples from turning brown.
apple3Unless I’m making apple jelly, I put the peels in the compost bin, and so should you!

apple4

This is one time when I use white sugar and don’t feel guilty about it–about 2/3 cup or to taste. Some apples need more sweetness, some need less. The most important ingredient is cinnamon. The right amount of cinnamon elevates the apple pie to a higher level.  I use approximately 3-4 tablespoons. I do a lot of tasting, so it’s a good idea to add a little at a time and taste as you go. My family loves a LOT of cinnamon!

apple6apple5

apple7

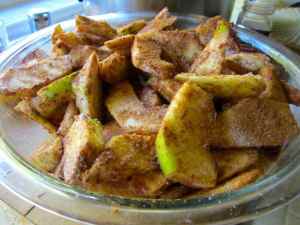
When you feel that your apples and sugar and cinnamon have reached the zenith of blissful co-existence, sprinkle one tablespoon all-purpose flour over the apples and mix lightly.

stressed is dessert spelled backwardsDon’t be afraid, don’t desert me before the dessert is complete–watch and learn!

It’s not that difficult. It’s like many things in life. Once you try something new and master it, you lose the fear of the unknown.apple8

I like my mom’s favorite cookbook for old-fashioned recipes.

The Crust
It’s not rocket science. This is a tried and true basic recipe for a two-crust pie. I don’t like to use butter in this crust because I don’t want any other flavors to taint the apple+cinnamon perfection. I know you can use a food processor and it cuts the time in half but sometimes the most satisfying part of baking is to be fully immersed in the process as much as the final results!

For a nine-inch pie pan:
Mix together…
2 cups all purpose flour
3/4 teaspoons salt
Cut in…
2/3 cup shortening
Sprinkle with…
Four tablespoons water

What does “cut in” mean? It means you need to distribute the shortening into the flour so that the particles become the size of peas. This is what makes pastry flaky. pastry-blender
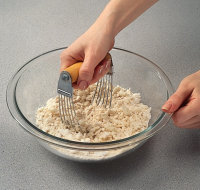
Use a pastry blender to cut shortening into flour. If you don’t have one, use two knives and this technique: holding a knife in each hand with blades almost touching, move knives back and forth in opposite directions in a parallel cutting motion. The side of a fork or a wire whisk works, too.

apple11 Mix only until all ingredients are worked in. If you overwork pastry dough, it’ll become tough. Sprinkle the water in a tablespoon at a time, mixing lightly with a fork until all the flour is moistened. Gather dough together and press into two balls for the upper and bottom crust.apple12

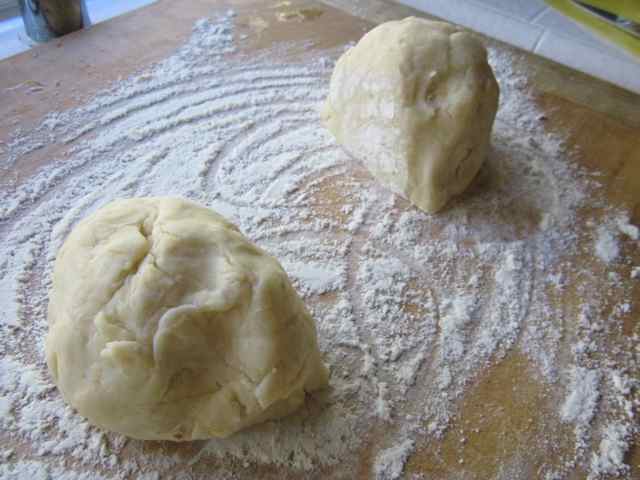
Flour the board or counter and the rolling pin so the dough won’t stick. There are all kinds of fancy schmancy rolling pins–I’ve been really happy with this old wooden one. Flatten the balls with your hand. Roll each ball into a sort of circle; don’t go all crazy thinking it has to be perfect at this point. If it breaks or tears, just pinch and push it back together–about 1/8 inch thick. For an apple pie, I think the bottom crust needs to be a bit more sturdy than the top crust–roll accordingly.

apple13

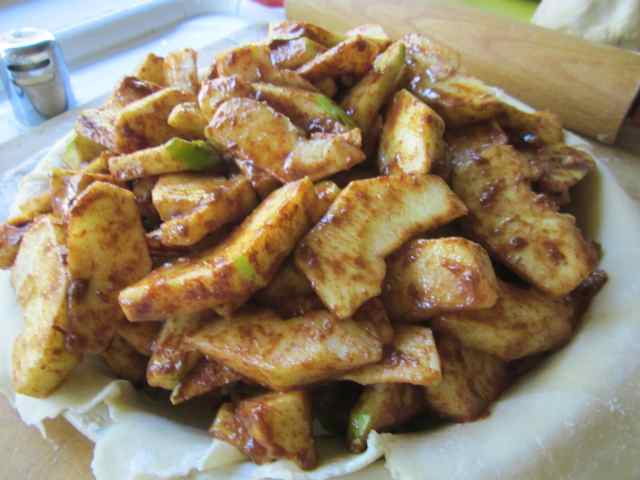
Roll into a circle two inches larger than pie plate. Fold pastry into fourths; place in pie plate. Unfold and ease into plate, pressing firmly against bottom and sides.

apple14

Pile high with the yummy apples.

apple15

Redo the same steps with the other round for the top crust. Cut off the extra dough that hangs over–leaving enough to fold under.

You can either crimp the edges…piecrustedges

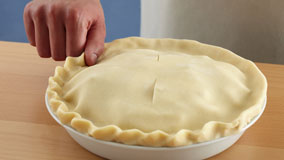
or use a fork. Dip fork tines in flour; press tines onto edge of dough. Poke with fork or knife all around to release steam as it bakes.apple18

I wanted to add an enchanted seashell embellishment to the final version.

apple16

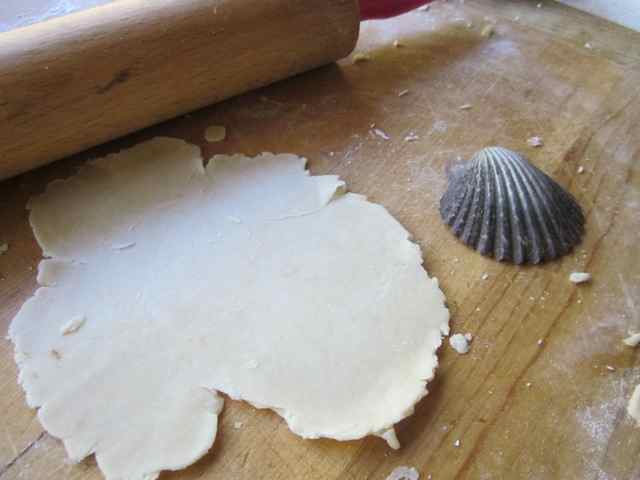
I molded leftover dough over a scallop shell, cut off the excess, and placed it on the pie.

apple17

It will bake quicker than the pie–remember to take it out after about ten minutes and place it back on the pie before serving.

I always bake pies on a cookie sheet because they will invariably ooze and turn your oven into a burning, sticky, smoky mess that can set off a smoke alarm and that’s always annoying!apple19

Bake at 425 degrees for about 45 minutes or so until it’s bubbly and the crust is beautifully browned.

apple20

Yummy!

apple21
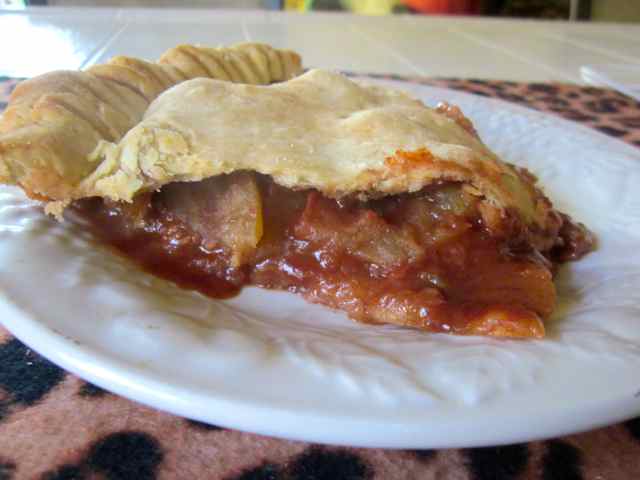
“Alright Mr. DeMille, I’m ready for my close-up”
(Norma Desmond, Sunset Blvd.)

finalapple

Come on, add this to your list of goals for 2013 and let me know how it turns out!

Powered by Linky Tools

Click here to enter your link and view this Linky Tools list…

Happy Valentine’s Day | For Chocolate Lovers | Vegan Lentil Brownies

I’ve had a bit of success with Black Bean & Beet Brownies and Lentil Cookies but I’ve never tried simply Lentil Brownies, so I baked some this morning before it got too hot to have the oven on.

They look good, right? But the real question is how do they taste?

If you’ve ever had Black Bean Brownies, you might have detected a slightly weird beany texture, so I hoped this lentil version would eliminate that.

These brownies are TRULY surprisingly yummy! They’re very moist and chocolate-y. I can’t tell they contain lentils, which IS a wonderful source of protein, so this is also a healthy snack.

Tips:
1. Really cook the lentils until they’re mushy.
2. Refrigerate the pan for at least a couple hours after frosting before cutting and eating.

Happy Valentine’s Day!

Healthy Super Bowl Recipe! Easy Veggie Burgers

These veggie burgers would be great for the Super Bowl along with guacamole and a gigantic pitcher of margaritas.

Add vegan mayo and/or ketchup and it’s so delicious, trust me!

I continually experiment with different ingredients to try and provide as much nutrition as possible and still taste good.

This is a complete meal for lunch or dinner or even on the go and it’s super easy because this time I used canned beans. Of course, you can always start with dried beans, but I used what I had on hand.

TIPS:
*Quantities can be adjusted for your specific needs; I like to make a lot so I can freeze some.
*They can be ovenbaked or in a pan on the stove.
*Use whatever veggies you like.
*I like to cook them until they’re crispy and crunchy on the outside for texture and because they hold together better, also because it makes them easier to pack and freeze.
*They’re delicious hot or cold; perfect for a hike or beach day.

Seriously Amazing *Vegan* Herb Crackers

Since we’re in a seemingly neverending spiral of virus mutations, the unvaccinated, and overworked healthcare professionals, I’m still trying to limit my exposure to PEOPLE. Not that it’s too difficult for me as I’m solitary by nature, but it’s still kind of annoying.

I had done my Traders shopping and when I came home, I realized that I had totally forgotten to get the kind of crackers I love to accompany Miyoko’s vegan cream cheese. Read about my love for THAT here: https://enchantedseashells.com/2021/04/06/yum-miyokos-vegan-cream-cheese/

Instead of doing what was normal practice in the old days, I didn’t run out and make that one purchase. Resourceful me decided to bake my own crackers. I haven’t done that in years and it’s so easy, I wonder why it took me this long to remember that! An added plus is no wasted plastic or containers, so I’m helping the environment too…

Tips: I substituted 1/2 cup buckwheat flour for all purpose flour. Next time I won’t do that because buckwheat is such a strong flavor. While it’s lovely in pancakes and soba noodles, it’s a bit too much here.

On the other hand, I gotta say that the smell of the herbs in the oven was so fragrant! It perfumed the entire house. I used all the herbs I have in the garden, but you can add whatever you like, including poppy seeds, sunflower seeds, sesame seeds. **Roll extremely thin for crispiest crackers. I didn’t cut them in perfect shapes or use a pizza cutter because I was too lazy and wanted them done in a hurry, but I kind of like the rustic look.

Ginger-Lime Quick Bread **Vegan**

All that rain we had yesterday made it literally impossible NOT to bake, so I did.

We had about 1 1/2 inches of rain and our strongest winds were 45+ mph. Stores closed in our little village because of power outages and streets were flooded.

My friend’s lime tree exploded with limes last week, so now I have about fifty limes as a result of her generosity. I juiced A LOT OF THEM and froze in ice cube trays. These are the juicy sweet Mexican limes that are so amazing in margaritas and guacamole. LImes + tequila = heaven.

I created this recipe after reading tons of similar ones on the internet.

After the worst of the storm passed, it was still windy but FREEZING. A hot mug of fragrant ginger tea was just what I needed along with a couple slices of yummy Ginger-Lime bread.

It came out soo moist and tender, I definitely recommend and will make again and again.

PS I can’t change the recipe graphic but I forgot the amount of ginger tea. Should read 1/4 cup to 1/2 cup.

Vegan Banana Buckwheat Pancakes w/Homemade Almond Milk

This turned out to be a drizzly and dreary Sunday morning, perfect for my famous buckwheat pancakes.

I had a couple very ripe bananas, so I figured that would be a great flavor enhancer but I didn’t have any liquid (just juice and wine haha) and didn’t feel like going to the store.

In vegan recipes, nut/oat milk is interchageable with cow’s milk and eggs aren’t really necessary. I didn’t have any plant milk but I did have raw almonds.

I’ve never made my own “milk” but this seemed like a good time to try. It’s super super easy. I was thinking of separating this into two posts and I still might, but since the recipe for vegan pancakes needed plant milk, I combined them.

Almond Milk

First, soak about one cup of almonds in bowl with four cups of water. The recipes recommend soaking for a minimum of four hours to overnight, but I’m impatient so I only waited a couple of hours.

Pour all of it into a high powered blender. This is when you can add a bit of salt or vanilla if you wish. Blend until it’s creamy and smooth.

Use a nutbag or strainer to separate the nuts from the liquid. I didn’t have a nutbag so I used a doublemesh strainer and then I squeezed the last bit of liquid with my very clean hand.

Cover and store in refrigerator. Definitely save the leftover pulp for baking.

Soak

Blend

Strain

Chill and enjoy!

Time for…

Vegan Banana Buckwheat Pancakes

Preheat griddle or pan

2 very ripe bananas
1 cup almond (plant) milk
2 tablespoons vegetable oil
1 tablespoon brown sugar or agave
1 teaspoon vanilla
Pinch sea salt (optional)
Mash the bananas with a fork. Add milk, oil, sugar, vanillla.
To the liquid ingredients, add all at once
1/2 cup all purpose or whole wheat flour
1/2 cup buckwheat flour
2 teaspoons baking powder.

Stir by hand until combined. Don’t overmix or pancakes won’t be fluffy.

When the griddle is hot, use a small amount of vegan butter to coat the surface.
Ladle the batter and watch for bubbles on the surface of the pancake.

When air bubbles start to rise to the surface at the center of the pancake, flip the pancake. Cook for another 1-2 minutes, or until nicely browned.

Serve with organic maple syrup or agave or jam. YUM. Super moist and fluffy!

Kale and Chard: A Burning Sensation

Someone once said that the definition of insanity is doing the same stupid thing over and over again with the same results — not learning the lesson — and I must confess that applies to me here!

I grow a lot of chard and spinach and lettuce and kale. They all seem to thrive at Casa de Enchanted Seashells. I cook some, freeze some, annoy everyone by putting it in every baked good from brownies to cookies, and I love to eat it raw.

That’s where this started. For a while, I’ve been picking chard and kale while I’m outside gardening, just to enjoy being Mother Earth in action.

For a similarly long time, I’ve noticed that after I eat raw kale and chard and sometimes spinach, my throat starts to burn, not like I ate something spicy, but like I mixed bleach and ammonia and inhaled it (yes, I’ve done that, too, accidentally of course).

After several experiences of this painful throat, I finally did what I should have done the first time, I GOOGLED the symptoms.

Lo and behold, it’s a THING.

Maria Hepler, RDN, CLT: Calcium, which is an essential nutrient for strong bones, can be found in many green leafy vegetables, such as collard greens, spinach, mustard greens, kale, and Swiss chard.

However, oxalic acid, an organic acid found in spinach, chard, and beet greens, and moderately in kale, among other plants, binds with the calcium they supply and reduces its absorption, so in their raw form these should not be considered a good source of calcium.

What are the symptoms that one has eaten too much oxalic acid?  These include burning in the mouth and throat, difficulty breathing, weakness, stomach pain, nausea, vomiting, and diarrhea.

Spinach contains phytic acid and oxalic acid. It may be better to steam the spinach and not to eat it raw.

For sensitive individuals, even small quantities of oxalic acid  eaten regularly can lead to kidney stones or bladder crystals, along with the problem of calcium depletion. 

Does this mean we shouldn’t add kale or other greens that contain oxalic acid to our smoothies? Not necessarily. Cooking or steaming these vegetables can significantly reduce the amount of oxalic acid present, which will help with calcium absorption (make sure to drain your greens thoroughly as the oxalates go in the water).

If this is a concern, it’s best to precook leafy greens and store them in the freezer (in individual portions) for quick access.

I never used to notice this reaction to acidity in raw greens but now that I know, I will definitely stick to picking lettuce for my garden treats.

Recipe: Refreshing Infused Herbal Water

As promised, I’m going to share my recipe for this refreshing and healthy herbal beverage. It’s been unseasonably warm here and I was getting tired of plain old water to hydrate and quench my thirst.

Every herb came from my garden. To sliced cucumber and lemon, I added

Thyme
Basil
Sage
Lemon verbena
Cilantro and cilantro flowers, the whole thing, stem included
Celery leaves (yes I grow celery)

I suggest that you try whatever you have in your garden. I might add a sprig or two of lavender, but it’s an overpowering addition and I wanted the purity of character that herbs impart. My parsley and marjoram are still seedlings and I didn’t have any ginger on hand or I would have sliced a big hunk of that, too. It’s fun to experiment…just make sure every plant is edible and non toxic

After refrigerating for a while to marry the flavors and chill, I poured it into a big glass and garnished with an orange nasturtium flower. Keep replenishing the water and it’ll stay fresh and yummy for about four or five days.

It was so delicious and refreshing! I felt exactly as if I was being pampered at a posh day spa.

Happy first Saturday in April!

Best Ever #Vegan Snickerdoodles

I had a hankering for some old fashioned Snickerdoodles just like I used to bake with my mom, only vegan this time.

I’ve been asked, so to clarify…yes, this is my pic I took of the just-baked Snickerdoodles, not a random Google photo.

I realize that a majority of my recipes are zero sugar and include all forms of kale and tofu and lentils; healthy and organic for the Angels, but they’re not here right now and I have truly eaten enough kale to last several lifetimes, haha.

I developed this recipe after doing tons of online research. The internet offers dozens of variations; some recipes include flax seeds, coconut sugar, and spelt/oat/amaranth/chickpea flours (including gluten free)–but I prefer to keep things simple.

My philosophy is that more people might want to try a vegan lifestyle if it’s not too complicated. At least at first, and then as one delves deeper into cruelty-free living, it’s fun to experiment with more exotic ingredients.

Gather ingredients; Cream of Tartar is the key to snickerdoodle’s unique flavor. I know it’s against all the rules to use Crisco shortening, but once in a while is OK, and it’s awesome for cookie texture.

I didn’t think anything could be better than my Vegan Chocolate Chip Cookies, but I was blissfully happy with the results of these crackly, chewy, intensely cinnamon-y full moon shaped pillows of satisfying spicy sweetness. (But not too sweet.)

If you have patience, let them cool for about ten minutes before eating, but if you’re anything like me, you won’t be able to wait. I hope you try them and let me know your results.

My friend is going to drop off a bottle of imported vanilla so I’ll make them again, but I might still use the maple syrup because the maple flavor really enhanced the spicy cinnamon profile.

Caution: I go HEAVY on the cinnamon because I love it so much. If you don’t, adjust the amount to be mindful of your own tastebuds.